Friday, December 5, 2008

Tutorial 4 for MCG 1024 H


39) Back to the MOVE TOOL and bring out the LAYER STYLE again.
40) Go to the BLENDING option on the top, turn on the BLEND INTERIOR EFFECTS AS GROUP and also adjust the opacity to become lower and press OK.
41) Now, we have a ice effect on the picture and the whole picture was done.

Thursday, December 4, 2008

Tutorial 4 for MCG 1024 G


33) And we can also add the new layer style and rename it.
34) Choose the background again, and go to the TOOL PALLET with choosing the RECTANGLE TOOL. Double check the option bar by clicking the SHAPE LAYERS.
35) Just click and drag on the outside of the background, what we gonna to do is, apply the new style that we create just now.
36) For additional edit, just click on the NEW MASK on the shape layer.
37) Just click on the LAYER MASK and press ctrl + backspace.
38) The purpose we do it, it's because we need to use the paint BRUSH TOOL to paint the part that we would like to paint on.

Tutorial 4 for MCG 1024 F


23) If you don't like the style u can click on the LAYER PALLET choose gradient and edit it.
24) We are doing some texture on it right now, just turn off all the visibility of the words, and choose background for editing.
25) Go to the CHANNEL, create a new layer for GREEN. The purpose we gonna do it it's because if we don't wan the GREEN after we edit, at least we have another copy backup.
26) Now, come to the FILTER click on BLUR and choose GAUSSIAN BLUR. Just adjust the pixels as you like.
27) And you can control your level by clicking ctrl + L, there are four button to let you move on.
28) To select the whole object just press on the ctrl + A, and now we gonna to save it up by name rust with the EDIT and click on DEFINE PATTERN.
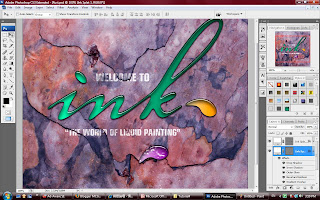
29) Once again, de-select and turn on the visibility RGB and also the visibility of the words.
30) Is time for the texture editing, just select the object click on the layer style for the edit. Go to the BEVEL and EMBOSS and turn on the TEXTURE.
31) Select the pattern that we just create and adjust the SCALE and DEPTH. Turn off the LINK WITH LAYER that mean the texture will fix to the background. And the most important is must click on the SNAP TO ORIGIN make sure all the align will fix with background.
32) And now, you can simply drag on the object move around, and the align will follow the background changed.

Tutorial 4 for MCG 1024 E


21) If you really like the style of your "ink" words, you can create a new style inside your STYLE pallet. Just click and drag and rename it.
22) And now, you can apply the exact same style on your others object or words.

Tutorial 4 for MCG 1024 D


16) Now, is change the bevel effect. Come down choose the BEVEL AND EMBOSS.
17) Make sure we are choosing the INNER BEVEL from style and the SMOOTH from the technique.
18) You can change the ATTITUDE to show out where was the light come from to your liquid, it'll make your object become more nicer.
19) You can adjust the OPACITY for the HIGHLIGHT MODE and the SHADOW MODE too.
20) A funny things is, you can come to the CONTOUR and turn it on, now you will see the highlight of your object changed. For extra adjusting, you can turn on the ANTI-ALIASED and set the RANGE.

Tutorial 4 for MCG 1024 C


10) After done for the gradient of the "ink" words, go to the INNER SHADOW to edit.
11) Just edit the opacity, angle, distance and size by your reference.
12) Now, it's come to the DROP SHADOW for your editing.
13) Repeat the step 11 on it. The different between INNER SHADOW and DROP SHADOW is one is the shadow inside the object and the another one is shadow outside the object.
14) Now, come to the OUTER GLOW. To apply another drop shadow, just choose the black color and change the BLEND MODE to multiply, and you'll see it.
15) You can also adjust the opacity and size from the OUTER GLOW with your preference.

Tutorial 4 for MCG 1024 B


6) Now, we get to see the "ink" words it's already have some gradient effect on it which is from white to black color.
7) To change the color, click on the GRADIENT box and it will appear box name GRADIENT EDITOR, inside the box we can go through the gradient bar double-click on the black color COLOR STOP to choose any color.
8) After you choose a color, do the same things on white color COLOR STOP too, but this time you have to choose a light color on it and click OK.
9) And now, you can choose the ANGLE to display your color from different angle.

Tutorial 4 for MCG 1024 A


1) Browse and find a file call rust.psd, then open it.
2) Press F for the full screen and make sure the picture is on the center.
3) Go to LAYER and click on the "ink" words and choose the right hand side box which is VECTOR MASK THUMBNAIL.
4) And then go to the VIEW click on ACTUAL PIXELS. What we gonna to do is change the "ink" word's color.
5) Go to the LAYER PALLET, and choose LAYER STYLE and click on GRADIENT OVERLAY.